
Panera Bread Recipe: 7 Authentic Secrets You Need to Know
Table of Contents
There’s something magical about a warm bread bowl filled with soup – crusty on the outside, soft and tender inside, and entirely edible! This Panera Bread recipe lets you recreate that magic at home, crafting the rustic crust and fluffy interior that make Panera’s bread bowls so beloved. (Fun fact: the name “Panera” comes from Latin for bread basket – quite fitting for a bakery known for its bread.)
If you’ve ever wanted to know how to make Panera Bread at home, you’re in the right place. This is one of those copycat Panera Bread recipes that delivers bakery-quality results in your kitchen. We’ll show you why this homemade version is a great copycat – from the fresh-baked aroma to the chewy center perfect for soaking up soup. Compared to another popular recipe from our blog (our fan-favorite sourdough loaf), these bread bowls are faster to make but just as impressive. By the end, you’ll be turning your kitchen into a cozy café.
And trust me, once you taste the crackly crust and soft crumb of these bread bowls, you’ll never want store-bought again. After all, bread you can eat your soup out of is about as comforting (and fun) as it gets!
What is the Panera Bread Recipe?
“Panera Bread Recipe” in this context refers to Panera’s iconic bread bowl – a crusty round loaf used as an edible bowl for soups. It’s a medium-sized round bread with the top sliced off and the insides hollowed out to create a bowl. The idea of serving food in bread has been around for ages (remember, the way to a man’s heart is through his stomach!).
Legend has it that an Irish nobleman back in 1427 impressed a duke by serving soup in a hollowed-out loaf – the first bread bowl! It must have worked (that duke was delighted) because bread bowls have been winning hearts ever since. Panera Bread, the famous bakery-café, popularized the concept in modern times by serving its chowders and chilis in sourdough bread bowls.
The name “bread bowl” says it all – it’s both your bowl and your bread, all in one. This playful creation turns a simple loaf into a fun dining experience. And don’t worry, you won’t need any special bakery oven to make it. We’re about to demystify the Panera Bread bowl recipe so you can recreate that café experience at home. Grab your apron, because as Panera has proven and our Irish noble friend would agree, baking bread is a surefire way to make memories (and yes, fill stomachs!).
Why You’ll Love This Panera Bread
There are so many reasons to fall in love with this Panera Bread copycat. First, the texture is out of this world – a crackly, golden-brown crust that gives way to a soft, chewy interior. It’s the perfect contrast, and it holds up beautifully to soups without getting soggy too fast. When you bake it fresh, the flavor and texture are even better than the bread bowls you might buy at the store or get from the café. Freshness is key – you’ll be serving these bowls warm from the oven, with that unmistakable fresh-bread aroma wafting through your kitchen (no bakery line needed!). Another big plus: it’s surprisingly budget-friendly.
For the cost of a few basic ingredients, you get six generous bread bowls. Imagine filling them with your favorite soup and feeding the whole family, at a fraction of the price of eating out. Also, you have control over every ingredient (no preservatives here), and you can even customize the size or topping.
Compared to store-bought bread bowls or generic bakery loaves, these homemade ones are more flavorful and have a rustic charm – each one is unique, with artisan-style cracks and a dusting of flour or seeds. And let’s not forget the sheer fun of it: Edible bowls! Kids and adults alike get a kick out of tearing into the bowl once the soup is gone. In short, you’ll love this recipe because it brings a bakery-café experience right into your home – warm, comforting, and utterly delicious.
How to Make This Panera Bread Recipe
Making Panera-style bread bowls at home might sound ambitious, but it’s very approachable. We use a simple yeast dough, a two-rise method, and basic techniques to achieve that rustic look and hearty texture. Below is a quick overview, and then a detailed guide on the steps. If you’ve been wondering how to replicate that Panera Bread menu item at home, get ready – we’re spilling all the secrets!
Quick Overview
This recipe is easier than you think! You’ll mix a few pantry staples into a yeast dough, give it two rises (one for the whole dough, one after shaping into bowls), and then bake. The dough itself comes together with minimal ingredients and effort – about 15 minutes of mixing and kneading, then the yeast and time do the work. After rising, you’ll shape six round balls of dough (these will become our bowls), let them puff up briefly, then bake at high heat to get that signature crust.
The entire process (including rise times and baking) takes a few hours, but the active work is not long. Here’s a snapshot: mix, knead, rise, shape, rise again, bake, and hollow out. By the end, your kitchen will smell like a Panera bakery, and you’ll have golden bread bowls ready to fill. Now, let’s dive into the ingredients and steps with a cozy, step-by-step guide.
Key Ingredients of Panera Bread recipe
| Ingredient | Amount |
| Active dry yeast | 2 tbsp |
| Warm water (110°F–115°F) | 3 cups |
| Sugar | 2 tbsp |
| Salt | 2 tsp |
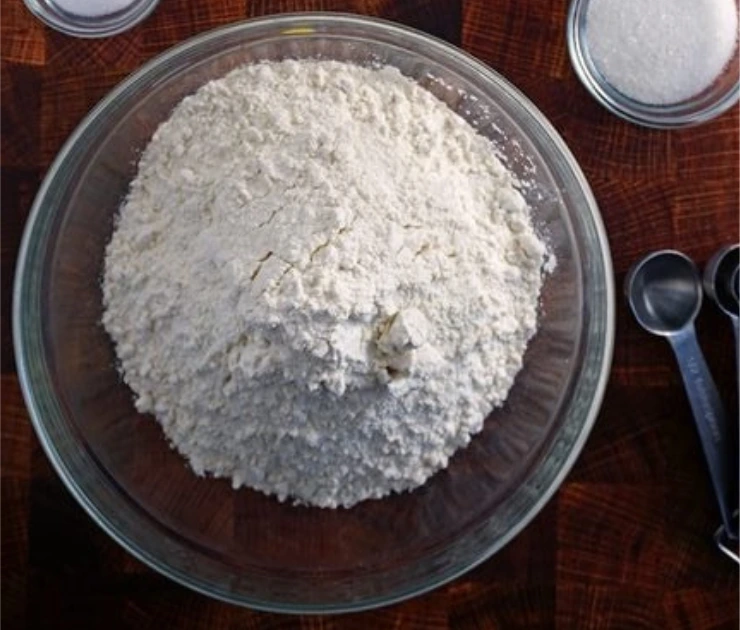
| Bread flour | 6½ to 7½ cups |
| Cornmeal (optional) | For dusting baking sheet |
| Sesame seeds (optional) | For topping loaves |
These simple ingredients come together to create bakery-style bread bowls. We use bread flour here, which has a higher protein content than all-purpose flour – that means more gluten development and a sturdier bowl to hold your soup (bread flour makes stronger, chewier bread for bowls).
The yeast is what gives the bread its lift and airy interior; we’ll be using a good amount of it to get a nice, quick rise. Warm water (around 110–115°F) wakes up the yeast – not too hot, or it could kill those yeast cells (115°F is a good target temperature). A touch of sugar feeds the yeast, helping it ferment and create that beautiful bread flavor (and also contributes a hint of sweetness to the bread).
Salt is critical in bread dough for flavor; it balances the sweetness and controls yeast growth so the dough doesn’t rise too fast. We have an optional cornmeal for dusting the baking sheet – this gives the bottom of the bread bowls a subtle crunch and prevents sticking. And finally, sesame seeds are an optional topping – Panera’s bread bowls are plain, but we love the nutty aroma and artisan look of sesame-crusted bread. Visually, picture a big mixing bowl with frothy beige yeast water, the snowy heap of flour, and maybe a sprinkle of golden sesame on top of each round loaf before baking – cozy bakery vibes all the way!
Step-by-Step Instructions
1.Activate the Yeast: In a large bowl, dissolve the 2 tablespoons of active dry yeast in 3 cups of warm water (110°–115°F). Give it a gentle stir. Let this mixture sit for about 5 minutes until the yeast gets foamy and creamy-looking on top (this tells you the yeast is alive and kicking). The warm water and a brief rest help wake up the yeast – you might notice a bready aroma as it starts to bloom.
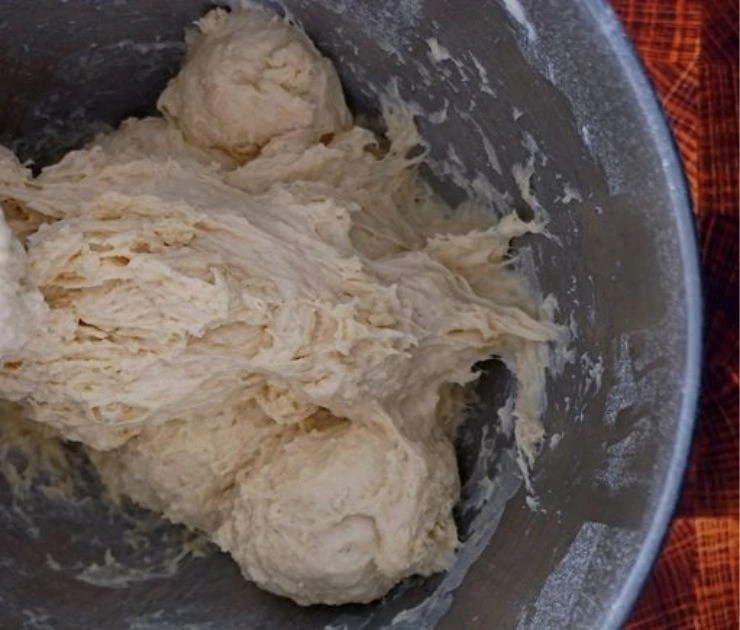
2.Make the Initial Dough: Stir in the sugar (2 tbsp) and salt (2 tsp) into the yeast water. Next, add about 3 cups of the bread flour to the bowl. Using a wooden spoon (or electric mixer with paddle attachment), beat this mixture for about 3 minutes. It will be a wet, batter-like mixture at this stage – that’s okay. Beating it introduces air and develops gluten. You’ll notice the dough becoming smooth and a bit stretchy. This quick batter stage is the foundation for a good chewy bread.
3.Add Remaining Flour to Form Dough: Now add the rest of the flour, one cup at a time, and stir. You’re aiming for a soft dough that pulls away from the sides of the bowl. It usually takes about 6½ to 7½ cups of flour in total, but go slowly – you might not need it all, or you might need a touch more, depending on humidity.
The dough should form a ball and be just a bit sticky to the touch (if you poke it, a bit of dough might stick to your finger, but it shouldn’t coat your hands in goo). When it gets hard to stir with a spoon, that’s your cue to turn it out for kneading.
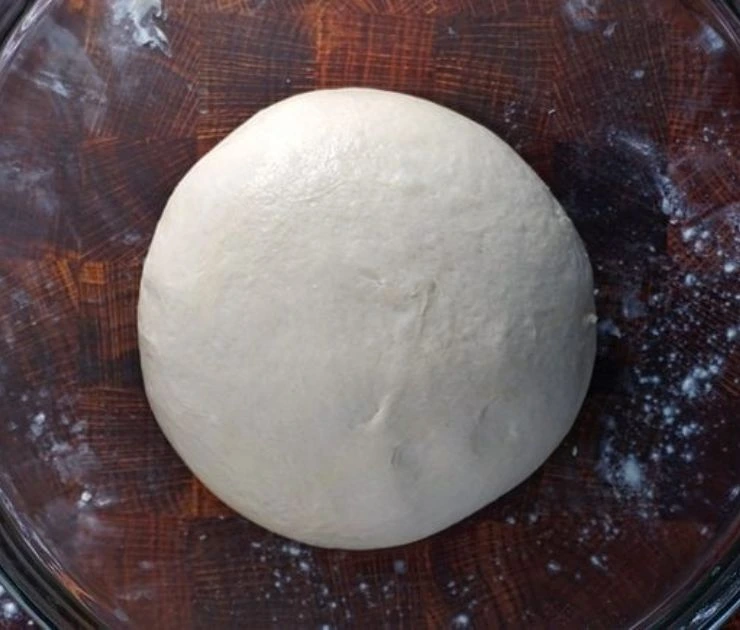
4.Knead the Dough: Turn the dough out onto a floured surface. Flour your hands and start kneading by hand: push the dough away with the heel of your hand, then fold it over, rotate and repeat. Knead for about 6–8 minutes. Alternatively, you can knead with a stand mixer’s dough hook for about 5 minutes. The goal is a smooth, elastic dough.
You’ll feel it becoming springy – if you press a finger in, the dough should slowly bounce back. Add small sprinkles of flour as needed during kneading if the dough is sticking to the surface. By the end of kneading, you should have a soft, supple dough that holds its shape (and your arms will have gotten a mini workout!). This step develops the gluten, which gives our bread structure and that lovely chew.
5.First Rise: Place the kneaded dough into a large bowl greased with a bit of oil or butter. Turn the dough once so the top is lightly greased as well (this keeps it from drying out). Cover the bowl with a clean kitchen towel or plastic wrap. Let the dough rise in a warm place for about 30 minutes, or until roughly doubled in size.
(If your kitchen is chilly, a trick is to put the bowl in a turned-off oven with the light on, or you can simply let it go a bit longer until it puffs up.) In this short proof, the yeast works its magic – you’ll come back to find a fuller, airy dough. It may not double completely in just 30 minutes, but it should be very puffy and soft when you gently poke it.
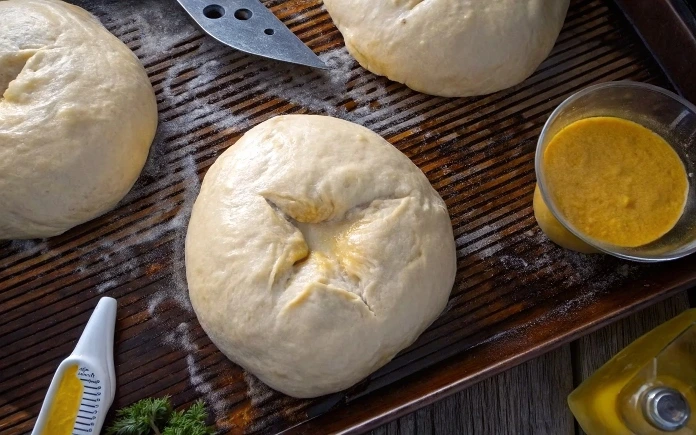
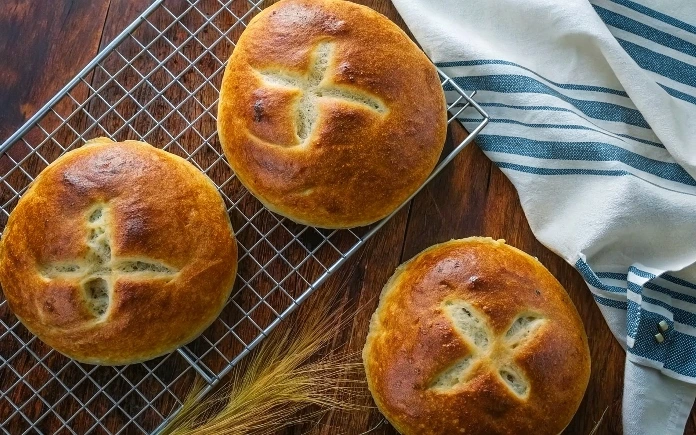
6.Shape the Bread Bowls: Punch down the risen dough to deflate it (this just means press your fist into the dough – it will collapse and release built-up air, which prevents large uneven holes). Now turn the dough out onto the counter and divide it into 6 equal pieces. For equal portions, you can eyeball it or use a kitchen scale. Take each piece and shape it into a tight ball: cupping your hands around the dough, tuck the edges under and rotate it in your palms to create a smooth, round top.
(Imagine stretching a rubber cap over the dough – you want surface tension on that top skin of the dough ball.) Place each dough ball onto a greased or parchment-lined baking sheet. If you have cornmeal, sprinkle a layer of cornmeal on the sheet before placing the dough – it gives a nice rustic touch and prevents sticking. Space the balls a few inches apart – they will expand. You should have six round dough mounds ready for a second rise.
7.Second Rise (Proof the Balls): Cover the dough balls lightly with a towel or plastic wrap and let them rise for about 15 minutes. This is a shorter rise just to let them puff slightly; they won’t double this time, but you’ll see them relax and get a bit larger. Meanwhile, preheat your oven to 500°F (yes, super-hot!). High heat is one of the secrets to a crusty bread. Place a rack in the center of the oven. After 15–20 minutes, the dough balls should look a little fuller. Before baking, we’ll do two quick things: spritz and score.
Fill a clean spray bottle with water (or just flick water with your fingers) and lightly mist the tops of each dough ball – this moisture will create steam in the oven and help develop a crisp, shiny crust. If you like, sprinkle sesame seeds on top of some or all of the loaves – they’ll stick to the damp dough. Finally, take a sharp knife or bread lame and score an “X” on the top of each dough ball, about ¼-inch deep. This classic X allows the bread to expand gracefully (plus it looks lovely on the finished bowl). Now you’re ready to bake.
8.Bake the Bread Bowls: Slide the baking sheet into the preheated 500°F oven. Bake at 500°F for 2 minutes – this initial blast of high heat helps the bread get a good jump (oven spring) and start forming the crust. After 2 minutes, without opening the oven, reduce the oven temperature to 425°F. Continue baking for about 16–18 more minutes at 425°F, or until the bread bowls are a deep golden brown. (Every oven is a bit different, so keep an eye on the last few minutes – they should be nicely browned but not burned.)
You can test for doneness by tapping the bottom of a bowl – it should sound hollow – or check that the internal temperature is around 190°F if you have a kitchen thermometer. Once baked, remove the bread bowls from the oven and let them cool on a wire rack for at least 10–15 minutes. They will smell heavenly – resist the urge to cut immediately, as the interior is still finishing its bake while it cools.
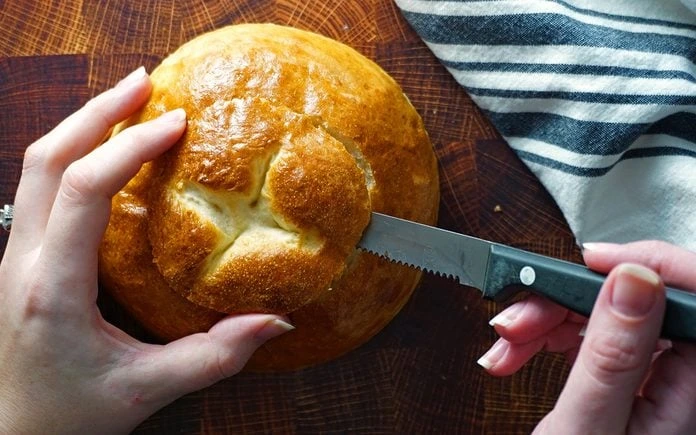
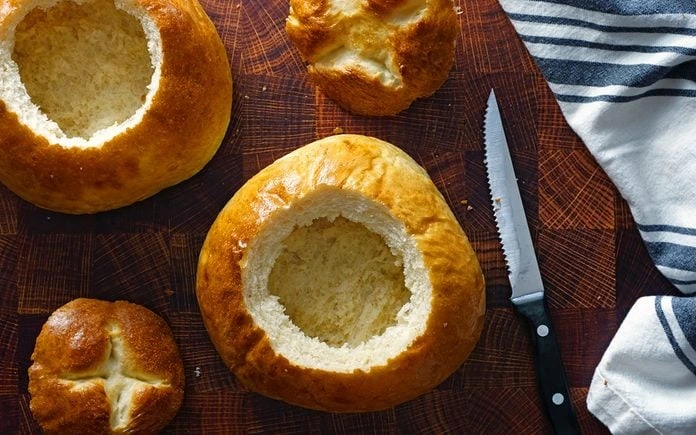
9.Hollow Out to Serve: When the bread is cool enough to handle (but ideally still a little warm), it’s time to turn these loaves into bowls! Using a serrated knife, cut a circular “lid” on the top of each loaf – angle the knife slightly inward as you cut, as if you were carving a pumpkin. Remove that top piece of bread and set it aside (this will be your delicious dipping lid).
Now, gently pull out the soft bread from inside the loaf, hollowing it out. Leave about a ½-inch thickness of bread all around so that the “bowl” remains sturdy. You should end up with a hollow bread bowl ready to be filled. Don’t toss the bread you removed – those pieces are perfect for nibbling or dipping into your soup. Voilà! You now have six homemade Panera-style bread bowls, golden and crusty on the outside, soft and light on the inside.
Freshly baked bread bowls cooling, with their tops sliced off and insides scooped – ready to be filled with your favorite soup! The crust is nicely blistered and sesame-speckled, while the interior is tender.
What to Serve with Panera Bread Recipe
Now for the fun part – filling your bread bowls! These bowls are extremely versatile and turn any meal into a cozy, restaurant-style experience. Typically, soup is the most popular filling. You can ladle in a classic broccoli cheddar soup (a Panera Bread soup recipe favorite) or creamy tomato bisque for that true Panera vibe. Other hearty soups like New England clam chowder, chunky chili, or potato soup are fantastic too – the thicker the soup, the better it will stay nestled in the bowl.
The bread will soak up just a bit of the broth, becoming extra flavorful (and giving you the best treat at the end – a soup-infused bread to eat!). Aside from soups, you can get creative: try a rich beef stew or chicken pot pie filling in the bread bowl, or even a creamy pasta. Yes, you heard right – imagine macaroni and cheese or fettuccine Alfredo scooped into your bread bowl for a fun twist on pasta night! It’s indulgent and scrumptious.
On the side, serve something light to balance the meal – a crisp green salad or simply the top of the bread bowl for dipping. And don’t forget a drink to complete the comfort-food experience: a hot herbal tea or warm apple cider pairs perfectly with a bread bowl meal, especially on a chilly day. Essentially, these bread bowls turn ordinary dishes into a memorable treat. Whatever you decide to serve, your homemade bread bowls will make it feel like you’re dining at your own Panera kitchen table.
Top Tips for Perfecting of Panera Bread recipe
Baking bread is part science, part art. To help you nail this Panera bread recipe bowl , here are seven authentic secrets and tips you need to know:
- Use Bread Flour for Structure: While you can use all-purpose flour, bread flour will yield a better chew and sturdier bowl. The higher protein forms strong gluten strands, which means the bread bowl holds its shape when filled. (It’s no coincidence Panera uses hearty flour – bread flour makes stronger dough.)
- Check Your Water Temperature: Yeast is a living organism and is happiest in warm water around 110°F–115°F. Use a thermometer if possible to get in the right range. Too cold, and the yeast may not activate fully; too hot, and you risk killing it. When in doubt, think “baby bath” warm – you should be able to comfortably dip your finger in.
- Knead Thoroughly (but Don’t Over-Flour): Kneading develops gluten, which gives the bread its elasticity. Knead until the dough is smooth and a bit springy. If it’s very sticky, add flour a tablespoon at a time, but try not to add too much extra flour during kneading. A slightly tacky dough leads to a moist bread. You can test by pulling a small piece – it should stretch without tearing easily. This ensures a light, chewy interior.
- Shape Tight, Round Balls: When forming the dough into those 6 balls, create surface tension by pulling the dough taut on the top of the ball and tucking the seams underneath. A tightly shaped ball rises upward (for a nice round bowl) rather than spreading out flat. Uniform shape and size mean they’ll also bake evenly. If you want precision, weigh each piece of dough so all bowls are equal – they’ll bake at the same rate.
- Don’t Skimp on Rise Times: It might be called “quick” bread bowls, but letting the dough rise sufficiently is key to good flavor and texture. The first rise develops flavor – wait until the dough has about doubled (if it takes a bit longer than 30 minutes, that’s fine). During the second rise (after shaping), even a 15–20-minute rest helps the gluten relax and the yeast get going again, so you get a better oven spring. Patience makes better bread. Remember, the dough is alive and needs time to work its magic!
- Spray with Water for a Crispy Crust: Ever wondered how bakeries get that crisp, shattery crust? One trick is adding steam to the oven. Spritzing the dough with water right before baking creates steam that encourages a thin, crackly crust. If you want an even shinier crust, you can brush with an egg wash instead (1 egg beaten with a little water) – but for an authentic rustic bowl, water is perfect. Also, the initial high heat (500°F blast) helps the crust set quickly and the bread to rise fully before the crust hardens.
- Know When It’s Perfectly Baked: It can be tricky to tell when bread is done just by color. A good guideline is to bake until the loaves are deeply golden brown. If you tap the bottom of a bread bowl, it should sound hollow. For extra assurance, use a kitchen thermometer – the interior should reach about 190°F. Avoid cutting into the bread too early; cooling for at least 10-15 minutes lets the interior finish cooking and prevents it from becoming gummy. And here’s a pro-tip: if you want extra crunchy crust, turn off the oven, crack the door, and leave the bread in for an additional 5 minutes after baking.
By following these tips, you’ll get the best possible bread bowls – beautifully risen, well-shaped, and crusty delights that rival the ones from Panera. These are the little secrets that take a good loaf to great!
Storing and Reheating Tips
Baked a batch of bread bowls and have leftovers? Here’s how to store them and bring them back to life later:
- Room Temperature: If you plan to use the bread bowls within a day or two, you can store them at room temperature. Let the bread cool completely, then place the bowls (and their cut-out tops) in a sealed plastic bag or an airtight container. They’ll stay soft inside for about 2 days at room temperature. (Avoid refrigerating fresh bread if possible – refrigeration tends to dry bread out quickly.)
- Freezing: For longer storage, the bread bowls freeze very well. Wrap each cooled bread bowl in plastic wrap or foil, and then place them in a freezer-safe bag. You can freeze the bowls for up to 2 months. For even more convenience, you can also freeze the dough before baking: after the first rise, punch it down, divide into balls, and freeze the dough balls (tightly wrapped). When ready to bake, thaw the dough overnight in the fridge, let it come to room temperature and rise, then bake as usual. If you freeze the already-baked bread bowls, let them thaw at room temperature before reheating.
- Reheating: To refresh that just-baked crust and warmth, the best method is the oven. Preheat your oven to 350°F. If the bread bowls seem a tad dry, lightly spritz or brush the outside with water (this helps re-crisp the crust). Place the bowls (no filling) directly on the oven rack or a baking sheet and heat for about 5-10 minutes until they’re warmed through and the crust crisps up again. They’ll come out tasting like they were baked fresh that day. Avoid microwaving the bread bowls if you want to keep the crust crispy – microwave heat will make the bread chewy and tough. If you’re in a hurry and must use a microwave, do so only for a brief 20-30 seconds to warm, then pop the bread in a toaster oven or under the broiler for a minute to restore crunch.
By storing and reheating properly, you can make your bread bowls ahead of time and still enjoy them at their best. Whether you save a couple for tomorrow’s lunch or freeze a batch for a future cozy dinner, these tips ensure your homemade Panera Bread bowls remain delicious. Now you’re all set to bake, serve, and savor your Panera Bread copycat creation whenever the craving strikes – happy baking and bon appétit!
- The Best 5 Classic Pineapple Bread Recipes: A Tropical Delight for Every Week
- How to Make Delicious Bread for Soup in 15 Minutes
🥖 Panera Bread Recipe – Homemade Bread Bowls
Yield: 6 bread bowls
Prep Time: 20 minutes
Rise Time: 45 minutes
Bake Time: 18–20 minutes
Total Time: 1 hour 30 minutes
Category: Bread
Cuisine: American, Bakery-style
Keywords: Panera Bread Recipe, bread bowl, copycat Panera, homemade soup bowl
🧂 Ingredients for Panera Bread recipe
- 2 tablespoons active dry yeast
- 3 cups warm water (110° to 115°F)
- 2 tablespoons sugar
- 2 teaspoons salt
- 6½ to 7½ cups bread flour
- Optional: Cornmeal (for dusting)
- Optional: Sesame seeds (for topping)
🥣 Instructions for Panera Bread recipe
- Activate Yeast: In a large bowl, dissolve yeast in warm water. Let stand for 5 minutes until foamy.
- Mix Dough Base: Stir in sugar, salt, and 3 cups flour. Beat on medium speed for 3 minutes.
- Add Flour: Gradually stir in remaining flour until a soft, slightly sticky dough forms.
- Knead: Turn onto a floured surface and knead for 6–8 minutes until smooth and elastic.
- First Rise: Place dough in a greased bowl, turning once. Cover and let rise for 30 minutes.
- Shape: Punch dough down. Divide into 6 balls. Place on greased or cornmeal-sprinkled baking sheets.
- Second Rise: Cover with a towel and let rise again for 15 minutes.
- Prep for Baking: Spray tops with water, optionally sprinkle with sesame seeds, and score an “X” on top.
- Bake: Bake at 500°F for 2 minutes, then reduce to 425°F and bake for 16–18 minutes until golden and hollow-sounding.
- Cool and Hollow: Cool slightly. Cut a thin lid off each loaf and hollow out inside, leaving a ½-inch shell. Serve with hot soup!
🍞 Serving Suggestions
- Broccoli cheddar soup
- Tomato basil bisque
- Creamy potato or clam chowder
📦 Storage
- Room temp: 2 days in an airtight bag
- Freeze: Up to 2 months wrapped and bagged
- Reheat: 350°F for 5–10 mins for crisp crust


